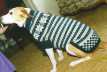
The Original Custom Fit Dog Sweater

designed by Esther Smith Bozak, copyright 1995, 1996.
(Please read the detailed copyright notice located at the end of the
pattern).
PREFACE
This pattern is the result of a several years' search for a well-fitting
sweater for our 68-pound short-haired Australian shepherd/beagle mix. I
ran into two major difficulties with the dog sweater patterns I was able
to find: either the pattern was sized only for small dogs, or if it did
come in sizes for larger dogs, the neck and chest measurements (the two
usual measurements one is asked to take) didn't match our dog's. If I
made it to fit her chest, the neck was droopy, and the dog's movement
would pull it down around her shoulders. Additionally, none of the
patterns I found provided what I felt was sufficient protection for our
dog against the snow and wind of a Central New York winter. So, I decided
to make my own pattern and devleoped the following sweater to be worn by our
"snow puppy" in those harsh conditions.
All comments are welcome! Please let me about your success or problems in
using this pattern, which was revised about 6 months after its initial
publication because of good feedback from the net.
Please include your dog's breed and neck & chest
measurements as this will help determine how robust the pattern really is.
I can be reached via email at
ebozak@cs.oswego.edu
or by snailmail at 103 E. Sixth St., Oswego, NY 13126.
MATERIALS:
1. YARN
a. TYPE: I strongly recommend using wool (or a wool blend that is at
least 50% wool) because a sweater made in wool will remain warm
even if it gets soaking wet. Sweaters made from synthetics will not.
Your dog will thank you.
b. WEIGHT: Sport, DK, or worsted weight are all appropriate. Pick
whichever is best for your area's winter weather.
c. AMOUNT: Anywhere from 1-12 ounces or more, depending on the size of
your dog, split between the colors you are using. Very small dogs will
generally need approximately 1-3 oz. total; medium sized, 4-8; large
dogs, 9+. Buy an extra skein or two -- it's better to have too much
than to run out, and you can use any leftovers to make you a matching
pair of mittens.
2. NEEDLES
You will need three different sizes each in double-pointed and/or
circular style. The actual lengths of any needles you use will depend on
the size of your dog and your actual gauge, and hence, the number of
stitches on your needles (described in the Preparation section below.)
a. The needles used for the body of the sweater should be a size
appropriate for the weight yarn you've selected, dp pointed for
small dog sizes, circular for medium & large sizes.
b. For the ribbing (neck, bottom edge, and sleeve), use one size smaller
than the needle size used for the body.
c. For the sleeve's cuff, use needles that are 3-4 sizes smaller than
the ones used for the ribbing.
For example, if I have decided to use a size 8 (American) for the body
of the sweater, I will need a size 7 for the ribbing and 3 or 4 for the
cuff.
PREPARATION:
1. Decide what pattern stitch you wish to use for the sweater. Just about
anything goes -- stockinette, striped, Fair Isle or other 2+ color
pattern, Aran/cables, mosaic, etc. Also, decide what type of ribbing
stitch you wish to use. Two good choices are K1,P1 and K2,P2, although you
can get as fancy as you wish.
2. Decide what type of yarn you want to use and choose a needle size
appropriate for the yarn's weight.
3. Using the needles you have chosen for your weight yarn, make swatches:
- of your chosen pattern stitch and determine the st and row gauge;
- in stockinette stitch, if this is not your chosen pattern stitch.
4. Measure your dog:
- a. around the neck (just collar-level, or midway up the neck, is good).
- b. around the biggest part of the chest.
- c. across the side of the upper front leg, at its widest point
(just at or below shoulder/underarm area is good).
Alternately, you can
measure the leg's circumference, instead of its width, and use half
the circumference as the 'width' for measurement c.
- d. along the back of the front leg, from the underarm to the elbow.
Or you could measure from the center back (the dog's spine) down
the dog's leg to the elbow. The corresponding measurement on the sweater,
when measuring for length of the sleeve, will be from its center back to
the bottom edge of the sleeve.
- e. down the front, from where you measured the neck to the underarm
of the front leg.
- f. along the front & underside, from where you measured on the neck
to the end of sternum/rib cage.
- g. along the neck & back, from where you took the neck measurement to
the base of the tail. This measurement will most accurate if taken
with the dog in sit position.
5. Add appropriate ease:
- a. Add 1/2 inch to 12 inches to the measurements 4a & b for ease and
convert
them to stitch counts, rounding up to a whole number. The larger the
dog, the more ease you probably will want to allow. Use your pattern
stitch's st/inch gauge for measurements 4b; use the stockinette
stitch's st/inch gauge for measure 4a. You may need to round up/down 1-2
for measurement 4a to give an even number of stitches for a K1,P1
ribbing. If you are using a K2,P2 ribbing, adjust the number of stitches
to be a multiple of 4. (if you are using some other fancy ribbing,
determine the necessary stitch repeat multiple and round up/down
appropriately.)
-
b. Add up to 1/2 inch ease to measurements c & f. If your dog is
exceptionally large or has very muscular legs, you may need to add more
ease. (The actual sleeve circumference includes the leg opening length
plus the width across the fronts & backs of each sleeve where the stitches
have been cast off/cast on for the leg openings.)
6. (Optional) Convert measurements c, d, e, f, & g to row counts using your
pattern stitch's row/inch gauge. Round up to a whole number.
MEASUREMENTS AND THEIR CORRESPONDING SWEATER COMPONENTS:
- a. Neck --> neck opening.
- b. Chest -- > widest point of sweater, reached at bottom of yoke.
- c. Leg width -- > sleeve opening at top.
- d. Leg length --> sleeve length.
- e. Neck-to-underarm --> depth of yoke.
- f. Neck-to-chest --> length of upper body.
- g. Neck-to-tail --> back length; total sweater length.
BEGIN KNITTING!
Whenever any measurements are specified, remember that they
should include the appropriate amount of ease from step 5 in the
'Preparation' section.
NECK:
Using the needles chosen for the ribbing, cast on the number of sts needed
for your dog's neck measurement (measurement 4a). Place a marker between
the first and last stitches of the round. Work rounds in ribbing of your
choice for 1-2 inches or desired length of neck ribbing.
YOKE:
Round 1: Changing to largest sized needles, work all sts in K, increasing
evenly to 70-75% of the total maximum number of stitches you will
need based on your dog's chest measurement (measurement 4b).
Round 2: Work even in desired pattern stitch.
Round 3: Work in pattern increasing 1 st after the round's first stitch
and one st before the round's last st.
Repeat Rounds 2 & 3 until you have achieved the total maximum
number of sts needed. [The percentage you use in Round 1 will depend on
the depth of the yoke (measurement e) and the number of stitches you
will need to make in this area to achieve the total maximum number of
stitches. You should plan your increases such that the total max. number
of sts has been reached preferably by the time the yoke sections is
completed, or no later than within the first 2-3 rows of leg opening
section. Adjust the % increased to in Round 1 accordingly.]
AT THE SAME TIME, when you have reached the desired depth to the front
legs' underarms (measurement 4f), cast off for the leg openings as follows:
work 9.5% after marker (1/2 of underside section between legs), cast off
8% for leg opening, work 65% for back section, cast off 8% for second
leg opening, and work remaining 9.5% sts to end of round. (Round up/down
where necessary, keeping the same number of stitches for the two leg
openings and centering the back section sts and the underside sections
each between the two legs.)
LEG-OPENINGS SECTION:
This next section can be worked as back and forth as two separate sections
(back and underside) or with steeks over the leg openings -- your choice.
If you decide to work as 2 separate sections, you may attach a second ball
and work the back and underside simultaneously, or you may work one at a
time, being careful to work the two sections for the same number of rows.
This is especially important if you are using any pattern stitch other
than stockinette st; the sections' patterns must match when they meet up
again.
If you have decided to use steeks, on the next round, cast on 5 sts over
each leg opening for the steek.
Working either in rows or rounds, continue in pattern over the back and
underside sections for a length equal to the front leg's width
(measurement 4c). It doesn't hurt to knit a couple extra rows/rounds for
ease.
If using steeks, bind off the steek sts on the last round worked; if
working rows, back and forth, begin rounds again at this point.
CHEST SECTION:
Work in pattern and over each leg opening, cast on the same number of
stitches you cast off for the opening. Work even until sweater length
reaches the bottom of the rib cage/sternum (measurement 4f).
Next round: Cast off 22% of the stitches for the belly stitches.
BACK SECTION:
Again, you may work the rest of the sweater back and forth in rows, or you
may work in rounds, using a steek over the belly stitches.
Round/Row 1: Work even in pattern. If working in rounds, cast on 5 sts
for the belly steek.
Round/Row 2: Dec one st each side edge; use SSK at beginning of
round/row and K2 tog at end.
Round/Row 3: Work even in pattern.
Repeat Rounds/Rows 2 & 3 until 55-56% of total max. sts are left for the
lower back. Work even until sweater length, as measured along the center
back line, equals 1 inch and 5 rows less than total desired length
(measurement 4g). If working rows, end such that right side is facing.
Next round/row: SSK, work to last 2 sts, K2 tog.
Repeat this round/row 4 more times. If using a steek, bind off the steek
sts on the last of these rounds. Cut yarn and place remaining sts on a
holder. Alternately, you may simply bind off all remaining sts.
Cut any steeks open.
BELLY GUSSET & BACK RIBBING:
Hold the sweater belly up & with wrong side facing. Using circular needles
of the size selected for the ribbing, starting at left-hand side edge,
pick up 1 st per row along side, k sts at lower back edge from holder to
needle, and pick up 1 st per row along right hand side edge.(If you have
cast off the lower back edge sts, then pick up 1 sts per sts along this
edge instead.)
Continuing, pick up 1 st for each cast-off sts at the underside -- these
sts will be referred to as the belly sts, and the rest of the sts, the
side sts.
Place a marker one st after the first belly st and one before the last
belly st picked up.
Row 1: Work in desired ribbing across *belly sts only*. As you work this
row, adjust the number of sts by decreasing when necessary so that
the resulting number of sts is an appropriate multiple + 1/2 multiple
for your ribbing st AND that you end with P sts on each side. (These
end belly sts will be K sts on the right side.) For example, if you
are using a K2,P2 ribbing, you will need a multiple of 4 + 2 sts and
the ribbing will be done as: K2; *(p2,k2); repeat from * to end.
For K1,P1 ribbing, you will need an odd number of sts, and the
ribbing will be knit as: K1, *(p1,k1), repeat from * across.
Row 2: Turn work to right side; with yarn behind, sl 1 side st from
right-hand needle to left, K2 tog, rib to st after 2nd marker, SSK
(last belly st and next side st on left needle.)
Row 3: Turn work to wrong side; with yarn in front, sl 1 side st on
right-hand needle to left, P2 tbl, work in ribbing to st after
2nd marker, p2 tog (last belly st and next side st on left needle.)
Repeat Rows 2 & 3 for 1" for small dogs, 1.5" for medium dogs, 2" for
large dogs, or until desired gusset length is reached. (The gusset should
be long enough to cover the "hollow" immediately below the dog's sternum.)
End after a Row 3 has been completed.
Turn work to right side. Begin working in rounds, ribbing across all
belly and side sts as follows:
Round 1: Sl 1 side st from right to left needle, K2 tog (belly st and
slipped side st), rib across belly sts to st after 2nd marker,
SSK (last belly sts and next side st), rib across all but the
last side st, adjusting side st count to be an appropriate
multiple for your ribbing pattern.
Round 2: K2 tog (last unworked side st and first belly st), rib across
belly sts to st after 2nd marker, SSK, continue around side sts
maintaining ribbing as established to last side st.
Repeat Round 2 until side ribbing is 1" in length (1/2" for small dogs.)
Bind off all sts loosely in ribbing.
SLEEVE:
Using the needles chosen for ribbing, pick up 1 st per row and 1 st per
cast-off st around leg opening. Work in rounds in the ribbing st you've
selected, adjusting (by decreasing) the number of sts to be an appropriate
multiple for your ribbing st. When sleeve length is approximately 3/4"
from desired total sleeve length (measurement 4c), switch to the needles
selected for the cuff. Continue ribbing until desired total sleeve length.
Bind off in ribbing.
Repeat for second sleeve. Be sure to adjust the number of stitches, if
necessary, to be identical with the number of stitches used in the first
sleeve.
APPENDIX A: ALTERNATE SLEEVES
ALTERNATE SLEEVE #1 WITH SNUGGER CUFF:
For K1,P1 ribbing -- Work as for original sleeve to cuff. Switch to
smaller needles. On next round you will decrease 25% of the sts currently
on the needle, 2 sts at a time, so first calculate what 25% of the sleeve
sts is. Round up/down to an even number. Plan the decreases evenly along
the round, placing them at (k1,p1,k1) sequences.
Now knit first cuff round as follows: Work in ribbing until you reach the
1st k1,p1,k1 sequence for a 2-st dec, sl 1 knitwise, k2 tog, PSSO (3-st
sequence has now been decreased to one k st). Continue ribbing around,
performing 2-st decreases at planned points. At end of round you should
have only about 75% of original number of sleeve sts left and the ribbing
should still be in "perfect" k1,p1 sequence. Continue work on reduced
number of sts until desired sleeve length. Bind off.
ALTERNATE SLEEVE #2:
Pick up sts around sleeve opening. Work in same pattern stitch as used for
sweater body (or some related variation to it) until ready to begin cuff.
Switch to smaller needles for cuff and work in desired ribbing st around,
decreasing evenly to about 75% of total number of sleeve stitches on the
first round of ribbing. Make sure you end up with an appropriate multiple
for the ribbing st you wish to use. Work cuff in ribbing until sleeve is
desired length. Bind off.
APPENDIX B: SUGGESTIONS
SUGGESTION #1:
You might want to make the first sweater for your dog without steeks so
that you can have him/her try it on at various points to check the fit.
These points are: 1) after the neck ribbing is completed; 2) before you
bind off the leg openings; 3) before you bind off the belly sts (checking
the length of the leg openings, too); and 4) before you decrease at the
lower back edge to round the corners. I have made sweaters using steeks
which required ripping out and adjusting *after* I had cut the steeks.
Doable, not definitely *not* fun.
(Yes, I am implying you make at least *2* sweaters for your dog. If she/he
is anything like mine, she/he'll get one wet playing in the snow and then
want to go back out before the sweater has time to dry. Just like a kid,
who always needs several pairs of mittens for this same reason. :-)
SUGGESTION #2:
If you are using a K2,P2 ribbing, when you are working on the first round
involving all the belly and side sts, you may find the ribbing will lie
flatter if you increase one st between each of the sts you picked up over
the area of the rounded corners.
SUGGESTION #3:
Write down all measurements (both actual and those resulting after adding
n the amount of ease you used), type of yarn used, sizes of needles used,
gauges, st/row counts, inches/rows actually knit in sections, etc.
Anything that you may need to make your dog a second sweater and have it
fit as well or better. This will save you a great deal of time if you
decide to use this pattern for your dog or someone else's.
COPYRIGHT NOTICE:
Copyright 1995, 1996 by Esther Smith Bozak. All rights reserved. It may
be used by individuals for personal use only. It can be distributed to and
shared with others as long as it remains fully intact, including this
copyright notice. It may not be sold, used to produce items for sale, used
in a compilation or archive of any kind, or used in any money-making
venture without the expressed written permission of the designer. All
rights are expressly reserved by the designer.
Last Updated: November 11, 2008
Esther S. Bozak
ebozak@cs.oswego.edu
URL: http://www.cs.oswego.edu/~ebozak/knit/dog.sweater.2008.html

